















Personal Area
Personal Area

How to Tamp Espresso Properly
Ask ten home baristas how hard to tamp and you will get ten different numbers, most of them some version of "30 pounds." It's one of the most repeated rules in home espresso, and also one of the most misunderstood. The real story is less about hitting a specific number on a gauge and more about what tamping actually does to the coffee bed, physically, and why levelness matters more than most people realize.
This guide breaks down how to tamp an espresso, why a level coffee bed matters more than an exact pressure reading, and how to choose a tamper and avoid common puck-preparation mistakes when using a manual espresso machine.
At a Glance
What tamping does |
Compresses ground coffee into a level, air-free bed |
Why it matters |
Creates uniform resistance so water extracts evenly under pressure |
Common pressure range |
15–30 lbs (roughly 7–14 kg) is typical; beyond that, more force adds little |
What matters more than force |
A level, even tamp with no tilt |
Technique to avoid |
Twisting or "polishing" the tamper after pressing |
Tool options |
Basic flat tamper, calibrated (pressure-gauge) tamper, self-leveling tamper |
Why do we tamp Espresso?
Ground coffee, straight out of the grinder, is loose and holds a fair amount of air between the particles. Without compressing it first, water would move through that loose bed quickly and unevenly, extracting far less than a properly prepared shot in the same amount of time, well short of the controlled 25 to 30 second extraction espresso is built around.
Tamping compresses the grounds into a dense, level bed, pressing out the air pockets and creating a uniform barrier that the machine's roughly 9 bars of water pressure has to work against. Done correctly, this forces water to move through the entire bed at a controlled, even rate rather than finding gaps to rush through. That evenness is what makes tamping a physical step with real consequences for flavor, not just a ritual gesture before brewing.
The 30-pound myth: does pressure really matter?
The "30 pounds of pressure" figure is one of the most cited numbers in home espresso, and it's worth understanding where it actually came from. It traces back to early commercial espresso training, where it functioned as a practical, easy-to-teach threshold, a way to make sure new baristas applied enough force to properly seat the puck, not a number derived from precise extraction physics. It was meant as a floor, not a target, but over decades of repetition it hardened into "the correct number," gauges got built around it, and it took on more authority than the original reasoning behind it ever had.
Here is what more recent, careful testing and widespread barista experience actually show: once ground coffee is compressed enough to eliminate the air pockets between particles, roughly in that same 15 to 30 pound range depending on grind and dose, additional force does very little. The coffee reaches a practical "lock-out point" where it simply won't compress much further, and pushing harder past that point doesn't meaningfully change flow rate or extraction. Side-by-side tests comparing shots tamped at 20 pounds versus 40 pounds, with equally level technique, tend to show only marginal differences.
What matters far more, and what the "hit exactly 30 pounds" framing tends to obscure, is levelness. A tamp applied at 25 pounds but tilted even slightly creates a puck that's denser on one side than the other. Water will always find that less-resistant side first, which is a direct path to channeling, regardless of how much total force you used. A slightly lighter tamp applied dead level will outperform a harder tamp applied crooked, every time.
The practical takeaway: apply firm, consistent pressure, somewhere in the 15 to 30 pound range is a reasonable target while you're building the habit but treat the exact number as far less important than making sure that pressure is even and repeatable shot after shot.
Step-by-step: the perfect tamping technique
- Distribute the grounds first. Level and break up any clumps before tamping (you can see the note on WDT below); tamping can't fix an unevenly distributed bed underneath it, it can only compress whatever unevenness is already there.
- Grip the tamper like a doorknob, with your palm over the top and fingers wrapped loosely around the handle for control, not gripped like a hammer.
- Position your body directly above the portafilter, wrist straight, elbow roughly at a right angle, and your shoulder aligned over the basket rather than pressing in at an angle. This alignment does more to keep the tamp level than focusing on the tamper itself.
- Press straight down with firm, even pressure, until you feel the grounds stop compressing further, generally somewhere in the 15 to 30 pound range described above.
- Lift straight up, without twisting. A "twist and polish" motion at the end (rotating the tamper before lifting) is a common habit, but it disrupts the puck's density right at the surface rather than helping seal it, and most modern technique guidance recommends skipping it.
- Check the surface. It should look flat, level, and slightly glossy, with no visible tilt from one side of the basket to the other.
- Wipe the rim of the portafilter to clear any stray grounds before locking it into the group head; loose grounds on the rim can compromise the seal and cause leaking around the edges.
Choosing the right tamper (flat, calibrated, leveling)
- Basic flat tamper: A solid, flat-bottomed tamper sized to match your portafilter basket (58mm is standard for most prosumer machines, but check yours) is genuinely all that's required. It's the cheapest option and, with practice, produces results indistinguishable from more advanced tools in the hands of someone who's built consistent technique.
- Calibrated (pressure-gauge) tampers: These include a spring mechanism that clicks or resists at a preset pressure, useful mainly for building muscle memory early on rather than as an ongoing necessity. Once you can tamp consistently by feel, most home baristas stop relying on the gauge.
- Self-leveling tampers: These use a pivoting or spring-loaded head that automatically adjusts to sit flat against the coffee bed regardless of small variations in your wrist angle, directly addressing the levelness issue described above. They're a genuinely useful upgrade for anyone who struggles with a consistent, tilt-free press, since they remove the most common source of human error in the whole process.
None of these tools are strictly necessary if your technique is solid; they mainly compensate for the parts of manual tamping that are hardest to self-correct without feedback, namely, whether your press was actually level.
Tamping and WDT: how they work together
Tamping and the Weiss Distribution Technique (WDT) solve two different problems, and it's worth being clear about the division of labor between them.
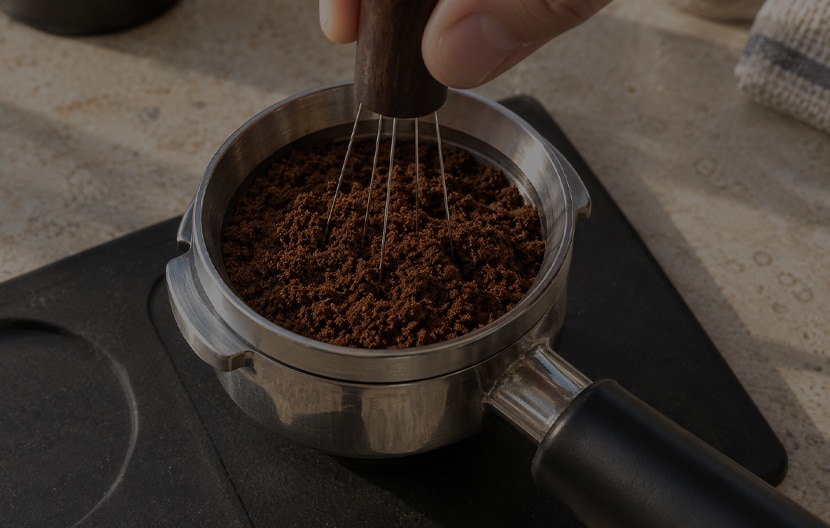
- WDT breaks up clumps and evens out the density of the grounds before compression.
- Tamping compresses whatever bed is already sitting in the basket into a level, dense puck. Tamping cannot fix an unevenly distributed bed underneath it, it will simply compress the unevenness in place. If you're seeing channeling despite a careful, level tamp, the more likely culprit is what happened before tamping, not the tamp itself.
Common tamping mistakes (and channeling)
- Tamping at an angle. The most common mistake, and the hardest to notice without deliberately checking. If your espresso stream sprays to one side or comes out as multiple thin jets instead of one steady stream, an uneven tamp is one of the first things to check, alongside clumping.
- Twisting or "polishing" after pressing. This disturbs the surface density you just created rather than sealing it, and can introduce inconsistency shot to shot.
- Double tamping (pressing, releasing, pressing again). This tends to fracture the puck's surface and can create small channels rather than a single solid bed.
- Skipping distribution before tamping. A tamp only compresses what's already in the basket. If the grounds went in unevenly, the tamp locks that unevenness into a dense, hard-to-fix puck.
FAQs
Does grind size change how hard I should tamp?
Slightly. Finer grinds already create more resistance to water on their own, so they generally need a touch less force to reach the same "lock-out" point. Coarser grinds may need marginally firmer pressure. In both cases, the difference is small compared to the impact of levelness.
Can I over-tamp espresso?
It's genuinely difficult to over-compress a puck to the point of harming extraction through force alone; once the grounds are fully compacted, additional pressure has limited further effect. The bigger risk with "trying too hard" is usually physical, repetitive strain on your wrist, not damage to the shot.
Why does my espresso spray to one side even though I think I tamped evenly?
This is the classic sign of a tilted tamp, water finds the less-dense side of the puck and channels through it. Double-check your stance (shoulder and wrist aligned directly above the basket) and consider a self-leveling tamper if the issue persists despite careful technique.
Is a calibrated tamper worth buying for a beginner?
It can help early on, mainly by giving you tactile feedback on what consistent, appropriate pressure feels like. Most people eventually stop relying on the gauge once that pressure becomes second nature, at which point a simple, well-made flat tamper does the same job.